Halloween
Zombie Fingers Recipe

What You Need:
String cheese
Bell Pepper
Cream cheese
Small spoon
Small knife
What You Do:
1.
Cut the string cheese in half to make the base of the amputated
finger.
2.
Help your child by carving out a small nail bed on the end of
one side of the cheese. The nail bed should be the same size as on an adult
fingernail. To make it appear more realistic, round the edges of the finger by
gently whittling any straight edges.
3.
Create a knuckle by cutting three lines midway up the “finger.”
4.
Place a tiny dot of cream cheese on the bed of the nail.
5.
Cut up the bell pepper into tiny, rounded squares and fit them
into the nail beds for a colorful fingernail, and you’re ready to munch!
Halloween Bat Decoration

What You Need:
Black construction paper
Clothespins
Google eyes
White crayon
Glue
Scissors
What You Do:
1.
Help your kindergartener cut a piece of black paper slightly
bigger than the clothespin. Let him glue it to the front of the clothespin. Set
aside to dry.
2.
Use a white crayon to draw a set of bat wings about six inches
across on black paper. Let your little one cut out the wings. Remind him to
keep both of his “thumbs up” while cutting. His hand holding the scissors
should have his thumb up, as well as his “helping hand” holding the paper. Help
your child learn to hold his scissors correctly from the beginning. Scissor
skills are an important component of kindergarten readiness.
3.
Have your kindergartener glue the bat wings to the front of the
clothespin, on top of the piece of paper you already attached to the
clothespin. Place the wings low enough on the clothespin so about a ½ inch of
the covered clothespin is visible at the top. This will be the bat’s head.
4.
Let your child glue google eyes to the bat’s head. If you do not
have google eyes available, your child could draw eyes using the white crayon.
5.
Your finished bats are ready to hang around the house. Use the
clothespin to attach them to any thin surface, or consider gluing a magnet to
the back of the clothespin to make a refrigerator magnet.
Christmas
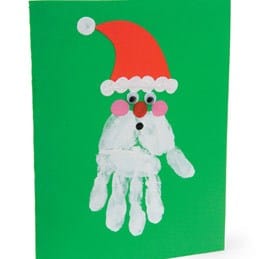
Handprint Santa
What You Need:
Red construction paper
Green construction paper
Black construction paper
Pink construction paper
Paper plate
White paint
Wiggle eyes
Newspaper
Scissors
Glue stick
Pencil
Marker
What You Do:
1.
Have your child fold the green construction paper in half and
set aside.
2.
Help her use a pencil to draw a triangular hat shape on the red
construction paper before cutting it out with scissors.
3.
Let her draw a circle on the red paper. This will be Santa's
bright red nose! Have her cut this out as well.
4.
Time to make Santa's blushing cheeks. Have your child draw two
circles on the pink construction paper and cut them out with scissors.
5.
To create Santa's mouth, let her draw and cut out one more small
circle from the black paper.
6.
Carefully help your child pour a thin layer of white paint onto
the paper plate.
7.
Have her dip her hand flat in the white paint so that the paint
covers the entire surface of her palm and fingers.
8.
Help practice stamping her painted hand on newspaper before she
moves on to the actual card. The trick is to press her hand solidly on the
paper without fidgeting and smearing the paint.
9.
Once she's confident with her technique, have her stamp her
freshly painted hand on the front of the folded green construction paper. Make
sure the fingers are showing -- this will be Santa's beard.
10. At the top of
the palm, have your child glue on Santa's paper hat, mouth, cheeks and nose.
11. Let her glue
on the wiggle eyes to complete Santa's face.
12. To add
additional hat details, help her fingerprint the base and top of the hat with
white paint dots.
13. Have your
child wash her hands before using a marker to write a little message inside the
card.
Christmas Handprint Craft

What You Need:
Newspaper
Poster board
Paint in assorted colors
Paper plates
Pencil
Ruler
Construction paper in
assorted colors
Scissors
White glue
What You Do:
1.
Begin by covering your workspace with newspaper, for easy
clean-up.
2.
Help your child draw a large triangle with pencil and ruler on a
light-colored poster board. Rotate board so that the point is facing down. It's
easier to paint the Christmas tree upside down.
3.
Help him pour a big puddle of green paint on a paper plate. You
can also fill a few other plates with different festive colors, like red and
yellow.
4.
Have him dip his hand in green paint and carefully press it onto
the poster board at the tip of the triangle, with his fingers pointing up.
5.
He will be making 5 rows of handprints. The first row will have
one handprint, the second two, the third three, and so on. Can he count how
many handprints will be on the tree, total? This is a great time to practice
counting!
6.
After creating every row on the Christmas tree, wash your hands.
Now let him decorate the tree by dipping his fingertips in the other colors and
dotting them throughout the branches. He can also add other embellishments to
the tree, like a rectangle for the trunk and yellow star at the top.
7.
Let the tree dry completely. Then cut it out and glue on red
poster board.
Handprint Reindeer (Alicia Garcia)

What You Need:
Light brown construction paper
Dark brown construction paper
Red pom pom
Pencil
Scissors
Glue
Wiggle eyes
Sock
Tape
What You Do:
Help your child trace her foot on a piece of dark brown construction paper.
Let her use scissors to carefully cut out the foot. This shape will be her reindeer's face.
Next, have her fold a sheet of light brown construction paper in half.
Help her trace on of her hands on the light brown construction paper.
With the paper still folded, have her cut out her traced hand from the paper. She should now have two hand shapes.
Let her tape the cut-out hands behind the reindeer head to create antlers.
Have her glue two wiggle eyes in place to give the reindeer goofy personality.The last touch is the "Rudolph red" nose! Help your child glue the red pom pom to the center of the reindeer's face.
Seasons
Learn the Four Seasons

Get your kindergartener started on Earth science with a lesson
on...the seasons! Challenge her season savvy with this worksheet that asks her
to write the name of each season under the correct picture. At the end, she'll
write a sentence about her favorite season for extra sentence building and
handwriting practice.

Autumn has arrived (Miriam)
Materials:
Papel, markers, crayons, colored pencis, scissors and glue stick
Description:
Give to the children a paper with a draw of a leaf for them to decorate after a mural for Autumn. Another way is that they draw the leaf and also they color it.
Other possibility is to make this mural with flowers when spring arrives, with snowmen when winter comes…
Writing Postcards: How's the Weather?

Your child can get practice identifying seasons (and also
writing postcards!) with this seasonal variety. Encourage your student to think
about what each season looks, feels, and smells like, then write it down on the
back of each card.
Father's Day
Father's Day
Funny Father's Day Card

What You Need:
Video camera or digital
recording device
Blank DVD or CD
Jewel case
Construction paper
Pen and markers
What You Do:
1.
Before you begin the project, write a short list of “interview”
questions or topics to discuss with your child. Example questions include:
o What are your
favorite activities to do with Dad?
o What is your
favorite thing about Dad?
o What does Dad
do to make you laugh?
o What makes
Dad so special?
o What makes
Dad a good father?
o What special
message do you want to tell Dad on Father's Day?
2.
Explain the idea of a video or audio card to him. Show him the
list of questions and give him time to think about his answers if necessary.
3.
When he is ready, sit down with him and record his answers to
the questions. Five minutes is an ideal length, but the recording can be as
long or short as he wants to make it.
4.
Transfer the recording to a blank CD or DVD.
5.
Help him cut a sheet of construction paper to fit inside the
jewel case. Ask him to write a short Father's Day message on the paper and decorate
it as he wishes. He can also use a permanent marker to label the CD.
6.
Fit the paper inside the jewel case and attach it as you would a
greeting card to Dad's Father's Day gift.
BOOKMARKS (Alicia Garcia)

